Lambda Authorizer – AWS SAM

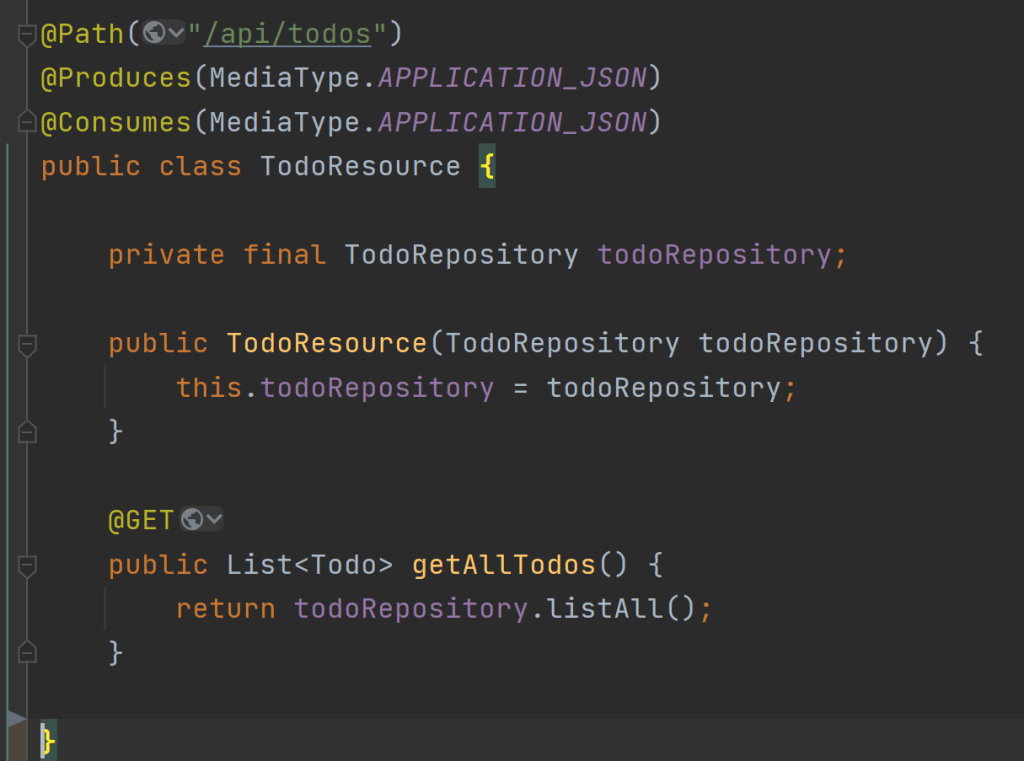
In my previous post, I have shared how to create a simple serverless lambda function using AWS SAM cli. In this post, I will explain on how to create a secure lambda Rest API.

Please note that there are different mechanisms for authentication and authorization of REST Apis. And Lambda authorizer is one such mechanism to control access to an API particularly if you want to implement a custom authorization scheme using OAuth or SAML.

Here is how it works, an extract from AWS documentation.

Lambda Authorizer workflow (from AWS documentation)

There are two types of Lambda Authorizers:

  • Token based Lambda authorizer (also called TOKEN authorizer)
  • Request parameter based Lambda authorizer (also called REQUEST authorizer)

In this example, we will be looking at REQUEST authorizer. Here is the link for the complete source code used in this post.

As a first step, let us initialize a new project using SAM CLI. You may refer my previous post if you are not familiar with SAM. I’ll be using Java11 as runtime for this project.

After initialization, you may run a “sam build” and optionally run the API locally using “sam local start-api” to verify if everything looks good so far.

Add a new Authorizer function

Add a new class, let us name it as Authorizer. The Authorizer function is yet another lambda function that implements RequestHandler interface. But instead of returning an APIGatewayProxyResponseEvent, the authorizer function will be returning a principal and Policy. Note that it is not necessary to make your Authorizer class in the same HelloWorldFunction module. You can also make your Authorizer function as a different module and share it across different functions and APIs.

public class Authorizer implements RequestHandler<APIGatewayProxyRequestEvent, AuthResponse> {

    @Override
    public AuthResponse handleRequest(APIGatewayProxyRequestEvent requestEvent, Context context) {
        APIGatewayProxyRequestEvent.ProxyRequestContext proxyContext = requestEvent.getRequestContext();
        APIGatewayProxyRequestEvent.RequestIdentity identity = proxyContext.getIdentity();
        String arn = String.format("arn:aws:execute-api:us-east-1:%s:%s/%s/%s/%s",
                proxyContext.getAccountId(),
                proxyContext.getApiId(),
                proxyContext.getStage(),
                proxyContext.getHttpMethod(),
                "*");

        String authorization = requestEvent.getHeaders().get("Authorization");
        if (!"Hello@Authorizer".equals(authorization)) {
            return apiGatewayResponse(identity.getAccountId(), "Deny", arn);
        }
        return apiGatewayResponse(identity.getAccountId(), "Allow", arn);
    }

    private AuthResponse apiGatewayResponse(String principalId, String effect, String resource) {
        return new AuthResponse(principalId,
                new PolicyDocument("2012-10-17",
                        new Statement("execute-api:Invoke", effect, resource)));
    }
}

In Authorizer, we are supposed to verify the incoming “Authorization” request header (or any request parameter of your choice) to verify if it is a valid OAuth token or a custom value.

In my example, I will keep my validation really simple (not to deviate from the topic). I’ll validate the request header “authorization” against a string value “Hello@Authorizer”. If the header value is not equal to this string, then deny the all calls towards the REST Api.

Take a note of the policy document that gets returned in both cases. If the authorization succeeds, then we send a policy with effect “Allow“, else “Deny“.

Let us now see how to apply the new Authorizer function to our Rest API. To apply the new Authorizer on my Rest API, I have created two additional resources in my template.yaml file.

One resource is the authorizer function itself (of type AWS::Serverless::Function and name AuthorizerFunction) and the second one is of type AWS::Serverless:Api (with name HelloWorldApi) and acts like a proxy to the original Rest API function (HelloWorldFunction). The serverless Api resource has an Auth property with a default authorizer that points to AuthorizerFunction arn.

Additionally I had to make these two changes

  • In HelloWorldFunction (Actual Rest API function) event properties I have added a RestApiId property that refers to the new Api resource.
  • In the output, replace the reference for implicit ServerlessRestApi with HelloWorldApi

Here is the content of the complete template.yaml file

AWSTemplateFormatVersion: '2010-09-09'
Transform: AWS::Serverless-2016-10-31
Description: >
  sam-lambda-authorizer

  Sample SAM Template for sam-lambda-authorizer

# More info about Globals: https://github.com/awslabs/serverless-application-model/blob/master/docs/globals.rst
Globals:
  Function:
    Timeout: 20

Resources:
  AuthorizerFunction:
    Type: AWS::Serverless::Function
    Properties:
      CodeUri: HelloWorldFunction
      Handler: helloworld.Authorizer::handleRequest
      Runtime: java11
      Architectures:
        - x86_64
      MemorySize: 512
  HelloWorldApi:
    Type: AWS::Serverless::Api
    Properties:
      StageName: Prod
      Auth:
        DefaultAuthorizer: MyLambdaRequestAuthorizer
        Authorizers:
          MyLambdaRequestAuthorizer:
            FunctionPayloadType: REQUEST
            FunctionArn:
              Fn::GetAtt:
                - AuthorizerFunction
                - Arn
            Identity:
              Headers:
                - Authorization
  HelloWorldFunction:
    Type: AWS::Serverless::Function # More info about Function Resource: https://github.com/awslabs/serverless-application-model/blob/master/versions/2016-10-31.md#awsserverlessfunction
    Properties:
      CodeUri: HelloWorldFunction
      Handler: helloworld.App::handleRequest
      Runtime: java11
      Architectures:
        - x86_64
      MemorySize: 512
      Environment: # More info about Env Vars: https://github.com/awslabs/serverless-application-model/blob/master/versions/2016-10-31.md#environment-object
        Variables:
          PARAM1: VALUE
      Events:
        HelloWorld:
          Type: Api # More info about API Event Source: https://github.com/awslabs/serverless-application-model/blob/master/versions/2016-10-31.md#api
          Properties:
            RestApiId: !Ref HelloWorldApi
            Path: /hello
            Method: get
Outputs:
  # ServerlessRestApi is an implicit API created out of Events key under Serverless::Function
  # Find out more about other implicit resources you can reference within SAM
  # https://github.com/awslabs/serverless-application-model/blob/master/docs/internals/generated_resources.rst#api
  HelloWorldApi:
    Description: "API Gateway endpoint URL for Prod stage for Hello World function"
    Value: !Sub "https://${HelloWorldApi}.execute-api.${AWS::Region}.amazonaws.com/Prod/hello/"
  HelloWorldFunction:
    Description: "Hello World Lambda Function ARN"
    Value: !GetAtt HelloWorldFunction.Arn
  HelloWorldFunctionIamRole:
    Description: "Implicit IAM Role created for Hello World function"
    Value: !GetAtt HelloWorldFunctionRole.Arn

That’s it. Lets deploy it an see if it works.

Important: Unfortunately the AWS SAM CLI doesn’t support authorizers yet when running code locally. However there is an open feature request to add support for it: https://github.com/awslabs/aws-sam-cli/issues/137. So even if you run it locally, the API response will always be success irrespective of the authorization parameter.

Let’s do a build (sam build) and deploy (sam deploy –guided) to AWS. Make sure that you have set up the credentials before deployment. If not, you will get an error like this “botocore.exceptions.NoCredentialsError: Unable to locate credentials”

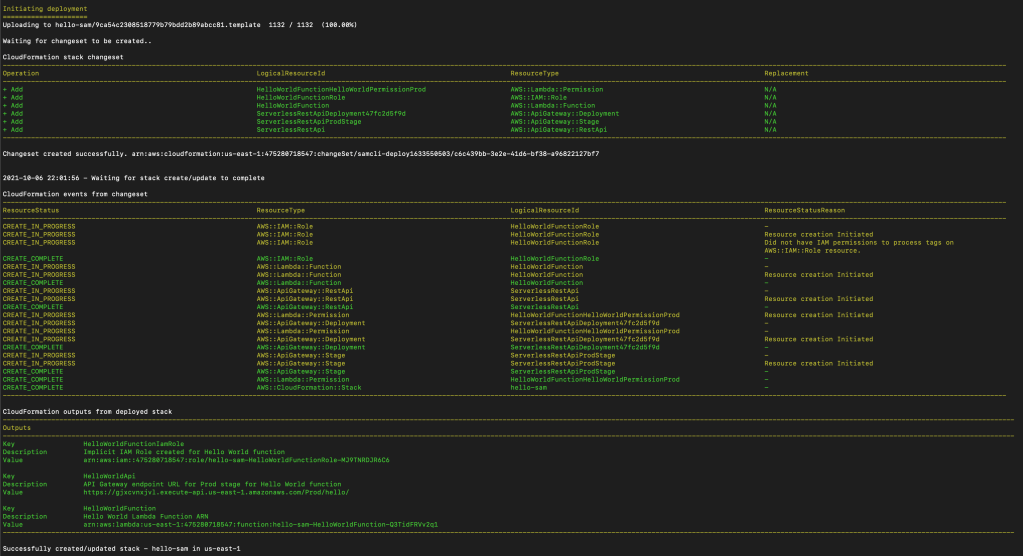
On successful deployment, you should see a screen like below.

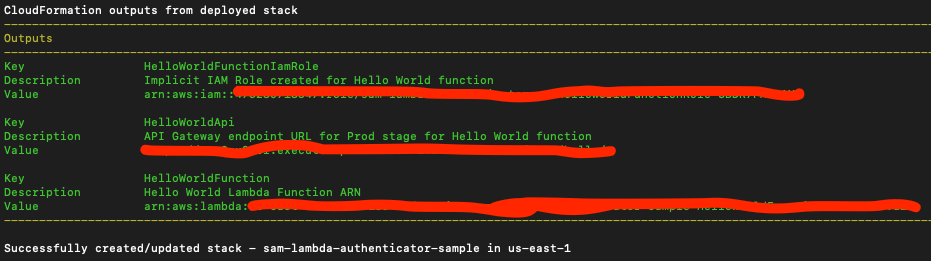
Lets do some testing. You should see that the API is not accessible anymore without authorization header.

And with proper authorization header, it works.

Note that it wasn’t straight forward for me to make my Authorizer work with SAM. Especially since there was no local support from SAM CLI for authenticators, I had to do some debugging, trial and errors to make it work. Here are some tips and tricks I followed to debug my lambda authorizer.

Tips and Tricks for debugging Lamda Authorizer

  1. CloudWatch – Logs are our best friends for debugging a lambda in AWS. Always keep an eye on cloud watch logs. Note that the log group for each function is different.
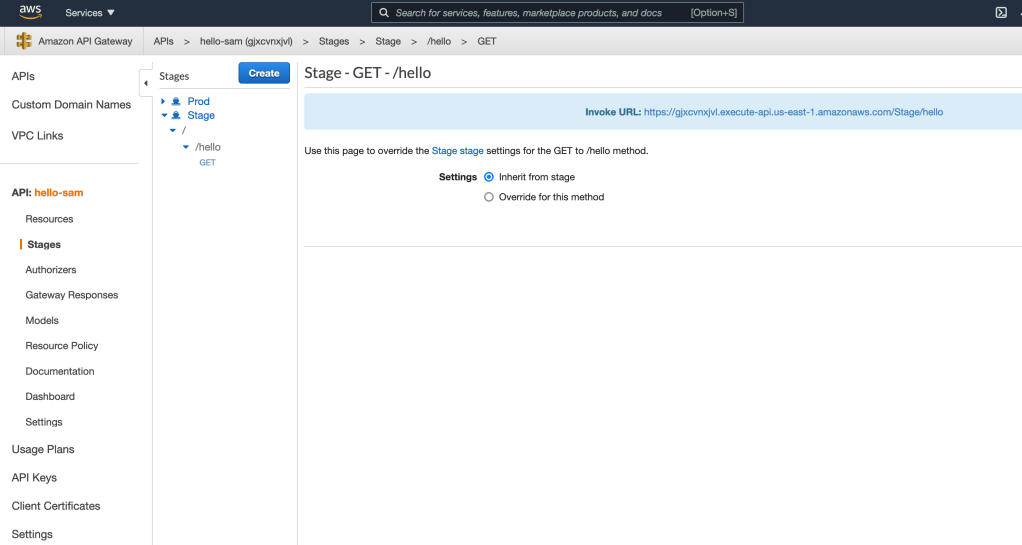
  2. Test the authorizer from AWS console before doing an E2E testing(refer below screenshot). Testing the API from Resources will not trigger the authenticator, it will always result in success response (I’m not sure if this is an AWS bug)
  3. Enable API gateway logging, if you want to debug the proxy event objects created by API gateway, enabling API gateway logs seems to be a better option than adding more log statements.
  4. Disable Authorization caching – This technique is helpful if you keep on changing your policy for same params and values.
  5. Log request event parameters within lambda – I am not sure if it is good to do but I had instances where in I was expecting a header parameter “Authorization” which came in as “authorization” (all small letters) that broke my case-sensitive logic. Logging the request params within the lambda function helped me there.
Figure: 1 – Test Authorizer from AWS console

I hope this post helps someone who is new to AWS lamda. Here is the link for the complete source code. Feel free to add your comments and queries (if any). I am happy to help.

Say “Hello” to AWS Serverless Application Model

What is Serverless?

The term “serverless” means that your code runs on servers, but you do not need to provision or manage these servers. It is a cloud-native development model that allows developers to build and run applications without having to manage servers.

With normal cloud computing using VMs or containers, you have to do 3 things

  1. Provision instance (virtual servers/containers)
  2. Upload your code
  3. Continue to manage the provisioned instances when your application is running

But with serverless, you just have to do only one thing – “upload your code”. You do not have to worry about provisioning instance or managing the provisioned instances. Almost all cloud service providers in the market have their own serverless service offerings.

AWS Lambda is one such serverless service offering from Amazon. AWS also provides an open source serverless framework called Serverless Application Model (SAM) that helps us to build and deploy serverless applications easily using a few lines of yaml.

Note that it is also possible to build and deploy AWS lambda functions without using SAM. For me SAM looks like a better approach.

Pre-requisite: It is expected to have a valid AWS account and sam cli installed. Follow this link if you don’t full-fill the pre-requisites.

Step#1sam init – generates a new serverless application project. You will be asked a few questions like shown below. Choose the options like I did (shown below) to stick to the basic serverless hello world application.

faisalkhan@MacBook personal % sam init
Which template source would you like to use?
	1 - AWS Quick Start Templates
	2 - Custom Template Location
Choice: 1
What package type would you like to use?
	1 - Zip (artifact is a zip uploaded to S3)	
	2 - Image (artifact is an image uploaded to an ECR image repository)
Package type: 1

Which runtime would you like to use?
	1 - nodejs14.x
	2 - python3.9
	3 - ruby2.7
	4 - go1.x
	5 - java11
	6 - dotnetcore3.1
	7 - nodejs12.x
	8 - nodejs10.x
	9 - python3.8
	10 - python3.7
	11 - python3.6
	12 - python2.7
	13 - ruby2.5
	14 - java8.al2
	15 - java8
	16 - dotnetcore2.1
Runtime: 1

Project name [sam-app]: hello-sam

Cloning from https://github.com/aws/aws-sam-cli-app-templates

AWS quick start application templates:
	1 - Hello World Example
	2 - Step Functions Sample App (Stock Trader)
	3 - Quick Start: From Scratch
	4 - Quick Start: Scheduled Events
	5 - Quick Start: S3
	6 - Quick Start: SNS
	7 - Quick Start: SQS
	8 - Quick Start: Web Backend
Template selection: 1

    -----------------------
    Generating application:
    -----------------------
    Name: hello-sam
    Runtime: nodejs14.x
    Architectures: x86_64
    Dependency Manager: npm
    Application Template: hello-world
    Output Directory: .
    
    Next steps can be found in the README file at ./hello-sam/README.md

If you look at the generated code, you can find a template.yml file which is the configuration that helps sam to deploy the function to the cloud. In the yaml, you can find a HelloWorldFunction resource which is linked to folder hello-world and app.js with some properties. CodeUri: hello-world/ tells SAM that the code is in hello-world folder. Handler: app.lambdaHandler tells SAM that the folder contains an app.js file with an exported function lambdaHandler. And app.js, lambdaHandler returns a dummy json response.

Step#2 cd hello-sam && sam build – Change directory to the new serverless application directory and do a build using command sam build

Building codeuri: /Users/faisalkhan/projects/personal/hello-sam/hello-world runtime: nodejs14.x metadata: {} architecture: x86_64 functions: ['HelloWorldFunction']
Running NodejsNpmBuilder:NpmPack
Running NodejsNpmBuilder:CopyNpmrc
Running NodejsNpmBuilder:CopySource
Running NodejsNpmBuilder:NpmInstall
Running NodejsNpmBuilder:CleanUpNpmrc

Build Succeeded

Built Artifacts  : .aws-sam/build
Built Template   : .aws-sam/build/template.yaml

Commands you can use next
=========================
[*] Invoke Function: sam local invoke
[*] Deploy: sam deploy --guided

Step#3 sam deploy --guided – deploys the serverless application to AWS. You will have to answer a few questions. As a pre-requisite to this step, you will have to set up AWS credentials.

Configuring SAM deploy
======================

	Looking for config file [samconfig.toml] :  Not found

	Setting default arguments for 'sam deploy'
	=========================================
	Stack Name [sam-app]: hello-sam
	AWS Region [us-east-1]: 
	#Shows you resources changes to be deployed and require a 'Y' to initiate deploy
	Confirm changes before deploy [y/N]: 
	#SAM needs permission to be able to create roles to connect to the resources in your template
	Allow SAM CLI IAM role creation [Y/n]: n
	Capabilities [['CAPABILITY_IAM']]: 
	HelloWorldFunction may not have authorization defined, Is this okay? [y/N]: y
	Save arguments to configuration file [Y/n]: 
	SAM configuration file [samconfig.toml]: 
	SAM configuration environment [default]: 

	Looking for resources needed for deployment:
	 Managed S3 bucket: aws-sam-cli-managed-default-samclisourcebucket-18pslmjrwi4hz
	 A different default S3 bucket can be set in samconfig.toml

	Saved arguments to config file
	Running 'sam deploy' for future deployments will use the parameters saved above.
	The above parameters can be changed by modifying samconfig.toml
	Learn more about samconfig.toml syntax at 
	https://docs.aws.amazon.com/serverless-application-model/latest/developerguide/serverless-sam-cli-config.html

Uploading to hello-sam/b7843bd63fc25ef551ad759148f4dba9  128393 / 128393  (100.00%)

	Deploying with following values
	===============================
	Stack name                   : hello-sam
	Region                       : us-east-1
	Confirm changeset            : False
	Deployment s3 bucket         : aws-sam-cli-managed-default-samclisourcebucket-18pslmjrwi4hz
	Capabilities                 : ["CAPABILITY_IAM"]
	Parameter overrides          : {}
	Signing Profiles             : {}

Now if you login to AWS console and navigate to Amazon API Gateway, you should see a hello-sam API listed there. Inside you can find that the API has a /hello GET endpoint. Navigate to Stages to see the different stages and the invoke url for each.

Step#4 (Optionally) You can also test your serverless function locally. Run this command sam local start-api to run the API locally. You should see an output like below.

faisalkhan@MacBook hello-sam % sam local start-api                                                  
Mounting HelloWorldFunction at http://127.0.0.1:3000/hello [GET]
You can now browse to the above endpoints to invoke your functions. You do not need to restart/reload SAM CLI while working on your functions, changes will be reflected instantly/automatically. You only need to restart SAM CLI if you update your AWS SAM template
2021-10-06 22:18:51  * Running on http://127.0.0.1:3000/ (Press CTRL+C to quit)

And when you browse the URL http://127.0.0.1:3000/hello, you can find more logs like below.

Invoking app.lambdaHandler (nodejs14.x)
Image was not found.
Removing rapid images for repo public.ecr.aws/sam/emulation-nodejs14.x
Building image...........................................................................................
Skip pulling image and use local one: public.ecr.aws/sam/emulation-nodejs14.x:rapid-1.33.0-x86_64.

Mounting /Users/faisalkhan/projects/personal/hello-sam/.aws-sam/build/HelloWorldFunction as /var/task:ro,delegated inside runtime container
START RequestId: 110f7195-3aa4-4ee3-90fb-957dbe76ae23 Version: $LATEST
END RequestId: 110f7195-3aa4-4ee3-90fb-957dbe76ae23
REPORT RequestId: 110f7195-3aa4-4ee3-90fb-957dbe76ae23	Init Duration: 0.23 ms	Duration: 117.94 ms	Billed Duration: 118 ms	Memory Size: 128 MB	Max Memory Used: 128 MB	
No Content-Type given. Defaulting to 'application/json'.
2021-10-06 22:20:13 127.0.0.1 - - [06/Oct/2021 22:20:13] "GET /hello HTTP/1.1" 200 -

So our hello world application is tested locally as well as is deployed in AWS cloud. I hope this post will help someone to begin with AWS serverless. Please feel free to add comments or raise your questions.

TDD – Todo application using Angular 11

As a pre-requisite, it is expected to have npm and angular cli installed in your machine. The installations are pretty straight forward, you may follow the links and install if you don’t have it in your machine.

The complete code for this can be found in my github url.

Step-1: First step is generate a new angular application. Lets name it as todo-angular.

ng new todo-angular

The CLI will ask for a few questions on whether a stricter type checking is required, angular routing is required and the stylesheet format. Lets stick to the defaults for now.

? Do you want to enforce stricter type checking and stricter bundle budgets in the workspace?
  This setting helps improve maintainability and catch bugs ahead of time.
  For more information, see https://angular.io/strict No

? Would you like to add Angular routing? No

? Which stylesheet format would you like to use? CSS

Step-2: Once the project is generated, run npm install command from the project folder so that all the project dependencies are downloaded. After this step, if you run ng serve command, angular builds and serves the app that can be reachable at http://localhost:4200 (if port 4200 is already in use, you will be asked if a different port can be used)

Step-3: Now lets generate a new component with name todo. Basically components are the building blocks of an Angular application and our goal here is to create a component that can list all todos. Run the below command

ng g c todo

Alternatively you can also run a more descriptive command – ng generate component todo.

The generate component command will create a folder todo with four files in it.

  • todo.component.css – The css file for this component. Any styles specific to this component should go in this file
  • todo.component.html – The component html template
  • todo.component.ts – The component class which will be written in TypeScript.
  • todo.component.spec.ts – The test case for the component

Step-4: Lets run the tests now using the below command. The command pops up a new browser window with the test results.

ng test

So far we haven’t added any custom code and so all the tests should be running fine. Note that by default ng test runs in a browser and also watches for any changes in the code. If there are any changes in the code, angular will automatically re-compile the code and re-run the tests.

Step-5: Now lets write a new test in todo.component.spec.ts.

A component, unlike all other parts of an Angular application, combines a HTML template and a TypeScript class. The component truly is the template and the class working together. To adequately test a component, we should test that they work together as intended.

Such tests require creating the component’s host element in the browser DOM and investigating the component class’s interaction with the DOM as described by its template. The Angular TestBed facilitates this kind of testing.

We can already see that the Angular component generator has already generated all the boilerplate code for the test case including the TestBed configurations.

Coming back to our test, as mentioned in step 3, our goal with this component is to list down all todos. Lets assume that we will display all todos in a table and each row in the table corresponds to a single todo. Also lets assume that we will have a CSS class for each row. And lets name the CSS class as todo-item.

So basically our test case should look for the presence of one ore more UI elements with CSS class todo-item. Lets see how the code looks like

it('should show all todos', () => {
    let element: HTMLElement = fixture.nativeElement;
    expect(element.querySelectorAll('.todo-item')?.length).toBe(2);
  });

ComponentFixture is a test harness for interacting with the created component and its corresponding element. Here we are using the nativeElement value from the component fixture which always returns a HTMLElement or one of its derived classes. (I think its worth to read about DebugElement if you are planning to run tests in a non-browser platform). HTMLElement.querySelectorAll method helps us to query the dom to find elements with class todo-item.

Like expected, the test case should fail because we don’t have any such elements in our html template.

Step-6: Lets add the code to make the test pass. Move on to the HTML template (todo.component.html) and add some static todo items to see if the tests are succeeding

<div class="todo-item">Copy</div>
<div class="todo-item">Paste</div>

Now the tests are running fine.

Step-7: Lets generate a model class for the Todo. Run the below command if you want Angular CLI to generate the model class. The flag –skip-tests=true tells Angular CLI not to generate tests for the model. Model class is just a normal TypeScript class that can be created manually as well.

ng g class todo/todo --type=model --skip-tests=true

Lets keep the model (todo.model.ts) simple. So I will add only three properties – id, name and description. Here is how the class looks like

export class Todo {
  constructor(
    id: string,
    name: string,
    description: string) {}
}

Step-8: Now lets see how we can connect to a backend service to fetch a list of todos. Lets generate a service for that. Run the below command to generate a todo service inside the todo component folder.

ng g s todo/todo

Alternatively, we can also use the descriptive command ng generate service. If you want to generate the service in a different folder, say services folder, then run the command ng g s services/todo. The above command generates two files – todo.service.ts (service class) and todo.service.spec.ts (test class for the service)

Step-9: Lets add a new test case for the generated service (todo.service.spec.ts). Angular CLI has already generated the boilerplate for the test class. Basically the service should connect to a backend API and fetch all todos.

Lets see how the test case looks like

describe('TodoService', () => {
  let service: TodoService;
  let expectedResult: Todo[] | null;
  let httpTestingController: HttpTestingController;

  beforeEach(() => {
    TestBed.configureTestingModule({
      imports: [HttpClientTestingModule],
    });
    service = TestBed.inject(TodoService);
    httpTestingController = TestBed.inject(HttpTestingController);
  });

  it('should return a list of todos', () => {
    const todos = [
      {
        id: '112233',
        name: 'Learn',
        description: 'Learn at leat one thing a day',
      },
      {
        id: '445566',
        name: 'Pratice',
        description: 'Practice what you have learned',
      },
    ];
    service.query().subscribe((response) => (expectedResult = response.body));
    httpTestingController.expectOne({ url: '/api/todos', method: 'GET' }).flush(todos);
    httpTestingController.verify();
    expect(expectedResult).toEqual(todos);
  });
});

Lets assume that there is a query method in the service class which returns an Observable http response with list of todos. Note that Observable type comes from RxJS, which is a library for reactive programming that makes it easier to compose async or callback-based code.

To mock the http call from the service, we have added a HttpTestingController that comes from the HttpClientTestingModule. Note that we should import HttpClientTestingModule in the TestBed configuration for HttpTestingController to work.

The below code imports HttpClientTestingModule in to TestBed configuration and injects a HttpTestingController in to the TestBed.

TestBed.configureTestingModule({
      imports: [HttpClientTestingModule],
    });
httpTestingController = TestBed.inject(HttpTestingController);

The below line sets up the http mocking, i.e., testing controller expects a GET call to /api/todos API and returns a JSON array of todos.

httpTestingController.expectOne({ url: '/api/todos', method: 'GET' }).flush(todos);

In the assertion, we verify if the testing controller was called by the service class (httpTestingController.verify()) and also check if the expected result from the service is the same as returned by the mock test controller.

After this, lets add a query method to our service class so that the build succeeds. Here is the query method without any implementation.

type EntityArrayResponseType = HttpResponse<Todo[]>;
...
query(): Observable<EntityArrayResponseType>{
    throw new Error('Method not implemented.');
  }

The tests will fail because the method is not implemented and it just throws an error.

Step-10: Lets implement the service – query method (todo.service.ts) now. To perform the backend API call, we will make use of HttpClient that comes in the anguarl/common/http package. Here is the code to make the backend API call

type EntityArrayResponseType = HttpResponse<Todo[]>;

@Injectable({
  providedIn: 'root'
})
export class TodoService {
  constructor(private httpClient: HttpClient){}

  query(): Observable<EntityArrayResponseType>{
    return this.httpClient.get<Todo[]>('/api/todos', {observe: 'response'});
  }
}

If {observe: ‘response’} is not provided in the httpClient get method call, angular will default the value of observe to ‘body’. In that case, we will get an Observable Todo lst response (Observable<Todo[]>) instead of Observable<HttpResponse<Todo[]>>.

With the above code change, the tests should be running ok.

Step-11: Now we have to call the service from component. Lets write the test case (todo.component.spec.ts) first.

describe('TodoComponent', () => {
  let component: TodoComponent;
  let fixture: ComponentFixture<TodoComponent>;
  let service: TodoService;

  beforeEach(async () => {
    await TestBed.configureTestingModule({
      imports: [HttpClientTestingModule],
      declarations: [TodoComponent],
    }).compileComponents();
  });

  beforeEach(() => {
    fixture = TestBed.createComponent(TodoComponent);
    component = fixture.componentInstance;
    fixture.detectChanges();
    service = TestBed.inject(TodoService);
    spyOn(service, 'query').and.returnValue(of(new HttpResponse({
      body:[
        {
          id: '112233',
          name: 'Learn',
          description: 'Learn at leat one thing a day',
        },
        {
          id: '445566',
          name: 'Pratice',
          description: 'Practice what you have learned',
        }
      ]
    })));
  });

  it('should show all todos', () => {
    expect(component).toBeTruthy();
    let element: HTMLElement = fixture.nativeElement;
    expect(service.query).toHaveBeenCalled();
    expect(element.querySelectorAll('.todo-item')?.length).toBe(2);
  });
});

We have injected TodoService in to the TestBed. And created a spy on the service’s query method. If the query method is called, then a HttpResponse with list of todos will be returned. And in the expectation, we just check if the service.query method to have been called.

Lets add a few more assertions to validate that the values from the component class are available in final DOM.

expect(element.querySelectorAll('.id')[0].textContent).toBe('112233');
expect(element.querySelectorAll('.id')[1].textContent).toBe('445566');
expect(element.querySelectorAll('.name')[0].textContent).toBe('Learn');
expect(element.querySelectorAll('.name')[1].textContent).toBe('Practice');
expect(element.querySelectorAll('.description')[0].textContent).toBe('Learn at leat one thing a day');
expect(element.querySelectorAll('.description')[1].textContent).toBe('Practice what you have learned');

So far we haven’t implemented the code to call the service or we haven’t changed the html template to use the values from the service, so the tests should fail.

Step-12: Let call the service from the component (todo.component.ts) now.

export class TodoComponent implements OnInit {

  todoList: Todo[];

  constructor(protected todoService: TodoService) { }

  ngOnInit(): void {
    this.todoService.query().subscribe((response: HttpResponse<Todo[]>) => {
      this.todoList = response.body;
    });
  }

}

Inject TodoService as a constructor param and subscribe to todoService.query response. On success response, set the response body to todoList property of component class. After this change, the below expectation will succeed. But still there are other assertions which will fail since the HTML template is static and hard coded.

expect(service.query).toHaveBeenCalled();

Step-13: Change the html template (todo.component.html) to use the values from the component class. Lets keep the template very simple not to loose our focus. We can look at CSS and styling in the future chapters.

<table>
  <thead>
    <th>ID</th>
    <th>Name</th>
    <th>Description</th>
  </thead>
  <tbody>
    <tr class="todo-item" *ngFor="let item of todoList">
      <td class="id">{{item.id}}</td>
      <td class="name">{{item.name}}</td>
      <td class="description">{{item.description}}</td>
    </tr>
  </tbody>
</table>

Here we have a table with header and body. In the body, we iterate through each item in the todoList and display the item’s id, name and description in the table.

Now the tests for todo-component should be working fine and the todo-component is ready to be glued to any other component. In this case, lets add the todo-component to our main app component.

Step-14: Add test case to use the todo-component in the main app component.

const compiled = fixture.nativeElement;
expect(compiled.querySelector('app-todo')).not.toBe(null);

Step-15: Add the todo-component to the main app component. Replace the html in app.component.html with the below code

<app-todo></app-todo>

That’s it. All tests are running fine and our application is ready to use. If you run an ng serve now from the application folder, we should be able to see a running application that displays a table of todos.

Note that there are chrome plugins available to simulate the behavior of backend APIs. For example, tweak mock API is a chrome plugin that helps t configure mock API calls for testing purpose.

When running the application, I noticed that the HTTP calls were not working like expected and to fix that I had to import HttpClientModule in app module configuration (app.module.ts) so that HttpClient dependency is available for all classes in the application.

@NgModule({
  declarations: [
    AppComponent,
    TodoComponent
  ],
  imports: [
    BrowserModule,
    HttpClientModule
  ],
  providers: [],
  bootstrap: [AppComponent]
})
export class AppModule { }

I hope the post was informative, we will see the implementation of other CRUD operations in the coming chapters.

Please refer my github for the complete code. Its possible that I would have missed some little configuration or code, so it is always best to go with the github repo.

Also feel free to share your comments and feedback if any.

Todo application using Java and Micronaut

In the previous chapter, we created a Todo application using Java, Quarkus and Mongodb. In this chapter, lets to the same using Java and Micronaut.

Quarkus/Kotlin – Before moving on to the Java/Micronaut implementation, lets quickly have a look at the quarkus kotlin combination. Here is my repository for the same – faskan/todo-kotlin-quarkus (github.com). Unfortunately testcontainers for mongodb didn’t worked like I expected in Kotlin – Quarkus combination. And I am yet to figure a way to do that. I have raised a question for the same in stack overflow, let’s see if someone has faced similar problems. Other than that the implementation was pretty straight forward like we did before with Spring Boot and Kotlin. The only changes are the usage of different annotations like JAXRS in place of Spring Rest and Panache in place of Spring Data. You may refer to my previous post for more details about those annotations.

Micronaut/Java – Coming back to Micronaut, here is my repository with Micronaut/Java implementation – faskan/todo-micronaut-java (github.com). I bootstrapped my application using Micronaut launch console

The micronaut launch console is similar to Spring Initializr and Quarkus application generatorhttps://code.quarkus.io/

Here is my test case, it tries to save a Todo object and retrieves all the todos and verifies if the saved todo was present in the response.

@Testcontainers
public class TodoResourceIT {
    @Container
    private static MongoDBContainer mongoDBContainer =
            new MongoDBContainer(DockerImageName.parse("mongo:4.2"));
    private static EmbeddedServer embeddedServer;
    private static HttpClient client;
    @BeforeAll
    public static void init() {
        embeddedServer = ApplicationContext.run(EmbeddedServer.class, PropertySource.of(
                "test", Map.of("mongodb.uri", mongoDBContainer.getReplicaSetUrl("micronaut"))
        ));
        client = embeddedServer.getApplicationContext().getBean(HttpClient.class);
    }
    @Test
    void shouldSaveTodo() throws JSONException {
        HttpResponse httpResponse = client.toBlocking().exchange(request(), Todo.class);
        assertEquals(HttpStatus.OK, httpResponse.getStatus());
        String response = client.toBlocking()
                .retrieve(HttpRequest.GET(embeddedServer.getURL()+"/api/todos"));
        JSONAssert.assertEquals("""
                [
                  {
                    "name": "test",
                    "description": "description"
                  }
                ]
                """, response, JSONCompareMode.LENIENT);
    }
    private HttpRequest<Todo> request() {
        return HttpRequest.POST(embeddedServer.getURL()+"/api/todos", new Todo("test", "description"));
    }
}

Differences with Qaurkus implementation – With quarkus, we added @QuarkusTest annotation for out test, and Quarkus booted the application and test lifecycle made sure that the static mongodb test container was started before the execution of test cases. With Micronaut, an equivalent for @QuarkusTest is @MicronautTest, but unfortunately the lifecycle of the test execution does not spin up the static mongodb test container before execution of tests. I am not sure if it is a bug or an intentional behavior.

Alternate approach – So I had to take an alternate approach where in instead of using @MicronautTest annotation, I just wrote it as a normal unit test and booted the micronaut application in the @BeforeAll method. @TestContainer annotation is used to integrate testcontainers with Junit5. Here is the documentation for the same – Jupiter / JUnit 5 – Testcontainers.

The below snippet spins up a micronaut application with embedded server.

ApplicationContext.run(EmbeddedServer.class, PropertySource.of(
                "test", Map.of("mongodb.uri", mongoDBContainer.getReplicaSetUrl("micronaut"))
        ))

The application context by default comes with a HttpClient bean that can be used for firing the test http requests towards the application. And therefore we have a second line in our beforeAll method to get that HttpClient bean from the application context.

client = embeddedServer.getApplicationContext().getBean(HttpClient.class);

Server URL to be supplied – It is not possible to test an endpoint like get("/api/todos") like we did in Quarkus. The server URL has to be supplied to the http client always like we did in the spring boot implementation.

Resource and Repository – Resource implementation is almost the same as in Quarkus or Spring Boot, except that micronaut comes with JAXRS type annotations inbuilt.

For Repository – Unfortunately I couldn’t find a Micronaut solution in place of Quarkus Panache or Spring Boot Data Mongodb. I could find a solution available for relational databases (Micronaut Data) but nothing for non-relational databases.

So the repository implementation needs a lot of lines of code which makes it unattractive solution. Here is my repository class, feel free to share if you have found better solutions

@Bean
public class TodoRepository {
    private final MongoClient mongoClient;
    public TodoRepository(MongoClient mongoClient) {
        this.mongoClient = mongoClient;
    }
    public List<Todo> getAll() {
        MongoCollection<Todo> collection = JacksonMongoCollection.builder().build(mongoClient,
                "todos-app", "todos", Todo.class, UuidRepresentation.STANDARD);
        return StreamSupport.stream(collection.find().spliterator(), false)
                .collect(Collectors.toList());
    }
    public void save(Todo todo) {
        MongoCollection<Todo> collection = JacksonMongoCollection.builder().build(mongoClient,
                "todos-app", "todos", Todo.class, UuidRepresentation.STANDARD);
        collection.insertOne(todo);
    }
}

You may try the other CRUD operations – update and delete yourself. I believe it would be more or less the same as the current implementation. Please feel free to share if you have found any major differences worth mentionable here.

Micronaut/Kotlin – Mean time, I have done the same exercise using Micronaut/Kotlin as well. But I’m not really satisfied with the results. First of all the tests of the generated code itself was broken (or not working well with the IDE) which slowed down my experiments. Here is the repository for the same. I will write another post for the kotlin implementations for both Quarkus and Micronaut after more detailed experiments.

I hope you have enjoyed the read. Please follow me on twitter to receive my latest experiments.

Todo App – Create a native image for Quarkus todo application

In the previous post, I created a todo application using Quarkus and Java. In this post, I am going to see how to create a GraalVM Native Image for the same.

First of all, package the application using native profile. The following command will create a linux executable file using maven native profile. Note that you should have a working container runtime (docker or podman) environment for this to work.

mvnw package -Pnative -Dquarkus.native.container-build=true

The second argument (quarkus.native.container-build) is needed only if GraalVM is not installed in your machine. After successful completion of this command, you will be able to find a todo*-runner executable file created in the target folder.

Now lets create a docker image for this executable file. Quarkus by default ships different types of docker files in the auto-generated code. Since our point of interest is a native image, we will make use of the native Dockerfile here.

docker build -f src/main/docker/Dockerfile.native -t quarkus/todo .

The above command creates a docker image out of the linux executable file. Now we can run this container using the docker run command.

docker run -p 8080:8080 quarkus/todo

Start up failed? Yes, there is still something missing, you can already see from the docker logs that the application cannot connect to mongodb database. Lets run a mongodb container and see if it works.

docker run -p 27017:27017 mongo:latest

With the above command, we are running a mongodb container. You can try connecting to this container from mongoshell or some other client application. The connection should normally work.

But the connection from our todo app container to mongodb container will still not work.

After some analysis I found that a communication from one docker container to another needs additional setup/configuration. There are different ways by which we can achieve this communication – like setting up a network, setting up a link or to create a docker compose file. I chose the most simplest solution, to use a docker-compose.yml file so that everything is in code.

Here is my docker-compose.yml file

version: '3.8'
services:
  web:
    build:
      context: .
      dockerfile: src/main/docker/Dockerfile.native
    ports:
      - 127.0.0.1:8080:8080
  mongo:
    image: mongo:4.4.4
    ports:
      - 127.0.0.1:27017:27017

The docker-compose file builds a docker image using Dockerfile.native file and runs it on port 8080. Also it runs a mongo image on port 27017. On top of this, I had to do a little change in my application.properties to change the host name in the connection string from localhost to the container name (mongo).

quarkus.mongodb.connection-string = mongodb://mongo:27017

Before changing the property, lets copy the application.properties file to test/resources directory so that the change will not impact the tests.

Again package the application using mvnw package -Pnative -Dquarkus.native.container-build=true command. A new todo*-runner file is created in target folder.

Now run docker-compose up command to build and run the docker image. Normally it takes only few milliseconds to bring up a native image application. Since we are doing docker build and mongodb start in the same docker-compose, the startup time might go for a couple of seconds.

Quarkus provides a way to test native image using @NativeImageTest annotation. Lets look at it in the future chapters. I hope this post was informative, please comment out to share your suggestions and feedback.

faskan/todo-java-quarkus (github.com)

Todo App – Java Quarkus

First of all lets bootstrap a new application using Quarkus – Start coding with code.quarkus.io. I chose Maven as build tool and added the below extensions.

  • RESTEasy Jackson – to help us create restful APIs
  • MongoDB with Panache – to help us persist the data in MongoDB

RESTEasy Jackson – Provides dependencies that helps us to create Restful APIs , serialize/de-serialize JSON to Java and vice-versa, etc. Consider it equivalent to spring-boot-starter-web dependency in a Spring Boot application.

MongoDB with Panache – Has all dependencies that helps us to connect to MongoDB and perform database read/write. Consider it equivalent to spring-boot-starter-data-mongo dependency in a Spring Boot application.

After generating the application, I have added a couple of additional dependencies in my pom.xml to help myself write better test cases and assertions.

  • RestAssured – to write clean tests in BDD pattern
  • AssertJ – for better readable assertions.
  • JSONAssert – for assertion of JSON content

In Spring Boot, AssertJ and JSONAssert dependencies comes by default under the spring-boot-starter-test umbrella. Here we have to add them explicitly.

Lets start with the first test case

Figure-1: TodoResourceIT.java

See the beauty of using RestAssured API. The test case is more readable, understandable and follows a BDD pattern. Coming back to the test case, the tests should fail at this point because we don’t have any implementation yet. Lets quickly jump on to the implementation.

Here comes the model class

Figure-2: Todo.java

In Spring boot application, we used Java record to create the Todo model class. But here our model has to extend PanacheMongoEntity (which provides an id property by default and other utility methods which might be needed going forward). Since Java record does not allow us to extend another class, we cannot use Java record any more for Todo model class.

Another thing to be noted here is that I have made the properties public instead of private with getter and setters. As per Quarkus documentation, it is allowed to make the properties public as well as private with getter and setter accessor methods.

Figure-3: TodoRepository.java

In case of Spring Boot, we created a repository interface that extends MongoRepository. For Quarkus, we have to create a class that implements PanacheMongoRepository. And we have to add an additional annotation @ApplicationScoped to mark it as a bean with application scope. You can find more information about quarkus application context, scope and dependency injection in here.

Figure-4: TodoResource.java

In the resource, we are using JAXRS annotations to build our Restful APIs. In Spring Boot, we were using spring web API to create our resources instead. Note that it is also possible to use spring-web API in Quarkus to create the Restful resources. Quarkus provides a spring-web extension for the same.

Mongodb database configuration Make sure that the connection-string is prefixed with proper environment (like %prod) if you are pointing to an actual database, if not, its possible that the test cases might alter your actual database.

#application.properties
%prod.quarkus.mongodb.connection-string = mongodb://localhost:27017
quarkus.mongodb.database = todos

But we didn’t had to do such a configuration in our spring boot application. Why? Because spring boot always comes with a set of auto configuration classes and default values. Which makes it optional to configure those properties. Hope that makes sense.

All set! Now if you run the tests, everything should be working fine.

Quarkus dev services – Quarkus offers dev services which boots up mongodb test container in dev and test mode.

It’s time to enrich our test class with additional test cases for other CRUD operations.

@QuarkusTest
public class TodoResourceIT {

    @Inject
    TodoRepository todoRepository;

    @AfterEach
    void deleteAll() {
        todoRepository.deleteAll();
    }

    @Test
    void shouldReturnAllTodos() throws JSONException {
        todoRepository.persist(new Todo("Find", "Find the letter F"));
        String response = given()
                .when().get("/api/todos")
                .then()
                .statusCode(200)
                .extract().response().asString();
        JSONAssert.assertEquals("[{\n" +
                "                    \"name\" : \"Find\",\n" +
                "                    \"description\" : \"Find the letter F\"\n" +
                "                }]", response, JSONCompareMode.LENIENT);
    }

    @Test
    void shouldReturnTodoById() throws JSONException {
        Todo todo = new Todo("Find", "Find the letter F");
        todoRepository.persist(todo);
        String response = given()
                .when().get("/api/todos/{id}", Map.of("id", todo.id.toString()))
                .then()
                .statusCode(200)
                .extract().response().asString();
        JSONAssert.assertEquals("{\n" +
                "                    \"name\" : \"Find\",\n" +
                "                    \"description\" : \"Find the letter F\"\n" +
                "                }", response, JSONCompareMode.LENIENT);
    }

    @Test
    void shouldSaveTodo() throws JSONException {
        Todo todo = given()
                .header(HttpHeaders.CONTENT_TYPE, MediaType.APPLICATION_JSON)
                .body(new Todo("Find", "Find the letter F"))
                .when().post("/api/todos")
                .then()
                .statusCode(200)
                .extract()
                .as(Todo.class);
        assertThat(todo.id).isNotNull();
        assertThat(todo.name).isEqualTo("Find");
        assertThat(todo.description).isEqualTo("Find the letter F");
    }

    @Test
    void shouldUpdateTodo() throws JSONException {
        Todo todo = new Todo("Find", "Find the letter F");
        todoRepository.persist(todo);
        //update
        given()
                .header(HttpHeaders.CONTENT_TYPE, MediaType.APPLICATION_JSON)
                .body("{\n" +
                        "                            \"name\" : \"Replace\",\n" +
                        "                            \"description\" : \"Replace by K\"\n" +
                        "                        }")
                .when().put("/api/todos/{id}", Map.of("id", todo.id.toString()))
                .then()
                .statusCode(200);
        //get
        String response = given()
                .when().get("/api/todos/{id}", Map.of("id", todo.id.toString()))
                .then()
                .statusCode(200)
                .extract().response().asString();
        JSONAssert.assertEquals("{\n" +
                "                    \"name\" : \"Replace\",\n" +
                "                    \"description\" : \"Replace by K\"\n" +
                "                }", response, JSONCompareMode.LENIENT);
    }

    @Test
    void shouldDeleteTodo() throws JSONException {
        Todo todo = new Todo("Find", "Find the letter F");
        todoRepository.persist(todo);
        //delete
        given()
                .header(HttpHeaders.CONTENT_TYPE, MediaType.APPLICATION_JSON)
                .when().delete("/api/todos/{id}", Map.of("id", todo.id.toString()))
                .then()
                .statusCode(204);
        //get
        given()
                .when().get("/api/todos/{id}", Map.of("id", todo.id.toString()))
                .then()
                .statusCode(404);
    }
}

Here you can see that I have injected TodoRepository in my test class so that I can delete all persisted data after each test run as well as perform other database operations when needed.

You might be wondering on why I didn’t use the multiline string literal instead of double quotes. Because the java version that we are using in this project is 11.

Again back to the resource to add all other CRUD operations.

@Path("/api/todos")
@Produces(MediaType.APPLICATION_JSON)
@Consumes(MediaType.APPLICATION_JSON)
public class TodoResource {

    private final TodoRepository todoRepository;

    public TodoResource(TodoRepository todoRepository) {
        this.todoRepository = todoRepository;
    }

    @GET
    public List<Todo> getAllTodos() {
        return todoRepository.listAll();
    }

    @GET
    @Path("/{id}")
    public Todo getTodo(@PathParam("id") String id) {
        return Optional.ofNullable(todoRepository.findById(new ObjectId(id))).orElseThrow(NotFoundException::new);
    }

    @POST
    public Todo saveTodo(Todo todo) {
        todoRepository.persist(todo);
        return todo;
    }

    @PUT
    @Path("/{id}")
    public Todo updateTodo(@PathParam("id") String id, Todo todo) {
        Todo newTodo = new Todo(new ObjectId(id), todo.name, todo.description);
        todoRepository.update(newTodo);
        return newTodo;
    }
    @DELETE
    @Path("/{id}")
    public void deleteTodo(@PathParam("id") String id) {
        todoRepository.deleteById(new ObjectId(id));
    }
}

Run the tests. All OK! Our Todo application using quarkus is now ready. For the complete code checkout my github.

One of the first and most important feature of Quarkus is that it’s Kubernetes-native. Quarkus was built around a container-first philosophy, meaning it’s optimized for lower memory usage and faster startup time. So the evaluation on Quarkus is never complete without having a native cloud deployment.

Stay tuned to learn more about the native deployment of Quarkus application.

I hope you enjoyed the read, please reach out to me if you have any suggestions or comments.

Jackson – deserialization of Integer to Enum

Problem Statement: I work in a Restful micro-service which is kind of a delegator or an orchestrator API on top of many other micro-services. Majority of the application logic lies in mapper classes that maps requests and responses to and from different dependent APIs. Having a clean and readable set of POJOs is a pre-requisite to have a clean, readable and maintainable set of mapper classes.

There are many instances wherein I had to de-serialize certain values coming from the dependent APIs to a Java enum. Normally when I want to deserialize a string, I use @JsonProperty annotation in my enum values to get it de-serialized to the enum.

For example, consider the below JSON payload which is a list of products. For some good reason, I had to declare productType as a enum in my POJO class. And Jackson’s @JsonProperty annotation helps me to de-serialize it.

[
  {
    "productName": "Savings",
    "productType": "PT01"
  },
  {
    "productName": "Loans",
    "productType": "PT02"
  }
]

Here is my POJO for an individual Product

@Data
public class Product {
    private String productName;
    private ProductType product;
}

@Getter
enum ProductType {
    @JsonProperty("PT01")
    PT01("PT01", "This is a savings product"),
    @JsonProperty("PT02")
    PT02("PT02", "This is a loans product"),
    @JsonEnumDefaultValue
    UNKNOWN("XX00", "This is a unknown product");
    private String code;
    private String description;

    ProductType(String code, String description) {
        this.code = code;
        this.description = description;
    }
}

But unfortunately, the above solution will only work when the incoming json value is a string. It won’t for integers and other data types.

For example, consider the below JSON payload

{
  "name": "NoName",
  "status": 101
}

The previous solution with @JsonProperty annotation will not work in this case because the data type of status is an integer.

Solution: I had to write a factory method with @JsonCreator annotation to fix this. And eere is my solution. If there are better alternatives, please feel free to add it in the comments.

@Data
class JsonPayload {
    private String name;
    private Status status;
}

enum Status {
    CODE_101(101, "OK"),
    CODE_102(102, "NOK"),
    UNKNOWN(-1, "UNKNOWN");

    private int code;
    private String value;

    Status(int code, String value) {
        this.code = code;
        this.value = value;
    }

    @JsonCreator
    public static Status fromCode(Integer code){
        return stream(values()).filter(e -> e.code == code)
            .findFirst()
            .orElse(UNKNOWN);
    }

}

Here I have a factory method fromCode that iterates through all the values and returns the appropriate enum. The @JsonCreator annotation is a marker annotation that helps Jackson to identify the factory method to be used for instantiating the status object.

@JsonCreator
public static Status fromCode(Integer code){
   return stream(values()).filter(e -> e.code == code)
            .findFirst()
            .orElse(UNKNOWN);
}

Checkout my github for my complete code. If there are better ways to do it, please comment it out in the comments section.