What is Serverless?
The term “serverless” means that your code runs on servers, but you do not need to provision or manage these servers. It is a cloud-native development model that allows developers to build and run applications without having to manage servers.
With normal cloud computing using VMs or containers, you have to do 3 things
- Provision instance (virtual servers/containers)
- Upload your code
- Continue to manage the provisioned instances when your application is running
But with serverless, you just have to do only one thing – “upload your code”. You do not have to worry about provisioning instance or managing the provisioned instances. Almost all cloud service providers in the market have their own serverless service offerings.
AWS Lambda is one such serverless service offering from Amazon. AWS also provides an open source serverless framework called Serverless Application Model (SAM) that helps us to build and deploy serverless applications easily using a few lines of yaml.
Note that it is also possible to build and deploy AWS lambda functions without using SAM. For me SAM looks like a better approach.
Pre-requisite: It is expected to have a valid AWS account and sam cli installed. Follow this link if you don’t full-fill the pre-requisites.
Step#1 – sam init – generates a new serverless application project. You will be asked a few questions like shown below. Choose the options like I did (shown below) to stick to the basic serverless hello world application.
faisalkhan@MacBook personal % sam init
Which template source would you like to use?
	1 - AWS Quick Start Templates
	2 - Custom Template Location
Choice: 1
What package type would you like to use?
	1 - Zip (artifact is a zip uploaded to S3)
	2 - Image (artifact is an image uploaded to an ECR image repository)
Package type: 1

Which runtime would you like to use?
	1 - nodejs14.x
	2 - python3.9
	3 - ruby2.7
	4 - go1.x
	5 - java11
	6 - dotnetcore3.1
	7 - nodejs12.x
	8 - nodejs10.x
	9 - python3.8
	10 - python3.7
	11 - python3.6
	12 - python2.7
	13 - ruby2.5
	14 - java8.al2
	15 - java8
	16 - dotnetcore2.1
Runtime: 1

Project name [sam-app]: hello-sam

Cloning from https://github.com/aws/aws-sam-cli-app-templates

AWS quick start application templates:
	1 - Hello World Example
	2 - Step Functions Sample App (Stock Trader)
	3 - Quick Start: From Scratch
	4 - Quick Start: Scheduled Events
	5 - Quick Start: S3
	6 - Quick Start: SNS
	7 - Quick Start: SQS
	8 - Quick Start: Web Backend
Template selection: 1

    -----------------------
    Generating application:
    -----------------------
    Name: hello-sam
    Runtime: nodejs14.x
    Architectures: x86_64
    Dependency Manager: npm
    Application Template: hello-world
    Output Directory: .

    Next steps can be found in the README file at ./hello-sam/README.md
If you look at the generated code, you can find a template.yml file which is the configuration that helps sam to deploy the function to the cloud. In the yaml, you can find a HelloWorldFunction resource which is linked to folder hello-world and app.js with some properties. CodeUri: hello-world/ tells SAM that the code is in hello-world folder. Handler: app.lambdaHandler tells SAM that the folder contains an app.js file with an exported function lambdaHandler. And app.js, lambdaHandler returns a dummy json response.
Step#2 – cd hello-sam && sam build – Change directory to the new serverless application directory and do a build using command sam build
Building codeuri: /Users/faisalkhan/projects/personal/hello-sam/hello-world runtime: nodejs14.x metadata: {} architecture: x86_64 functions: ['HelloWorldFunction']
Running NodejsNpmBuilder:NpmPack
Running NodejsNpmBuilder:CopyNpmrc
Running NodejsNpmBuilder:CopySource
Running NodejsNpmBuilder:NpmInstall
Running NodejsNpmBuilder:CleanUpNpmrc

Build Succeeded

Built Artifacts  : .aws-sam/build
Built Template   : .aws-sam/build/template.yaml

Commands you can use next
=========================
[*] Invoke Function: sam local invoke
[*] Deploy: sam deploy --guided
Step#3 – sam deploy --guided – deploys the serverless application to AWS. You will have to answer a few questions. As a pre-requisite to this step, you will have to set up AWS credentials.
Configuring SAM deploy
======================

	Looking for config file [samconfig.toml] :  Not found

	Setting default arguments for 'sam deploy'
	=========================================
	Stack Name [sam-app]: hello-sam
	AWS Region [us-east-1]:
	#Shows you resources changes to be deployed and require a 'Y' to initiate deploy
	Confirm changes before deploy [y/N]:
	#SAM needs permission to be able to create roles to connect to the resources in your template
	Allow SAM CLI IAM role creation [Y/n]: n
	Capabilities [['CAPABILITY_IAM']]:
	HelloWorldFunction may not have authorization defined, Is this okay? [y/N]: y
	Save arguments to configuration file [Y/n]:
	SAM configuration file [samconfig.toml]:
	SAM configuration environment [default]:

	Looking for resources needed for deployment:
	 Managed S3 bucket: aws-sam-cli-managed-default-samclisourcebucket-18pslmjrwi4hz
	 A different default S3 bucket can be set in samconfig.toml

	Saved arguments to config file
	Running 'sam deploy' for future deployments will use the parameters saved above.
	The above parameters can be changed by modifying samconfig.toml
	Learn more about samconfig.toml syntax at
	https://docs.aws.amazon.com/serverless-application-model/latest/developerguide/serverless-sam-cli-config.html

Uploading to hello-sam/b7843bd63fc25ef551ad759148f4dba9  128393 / 128393  (100.00%)

	Deploying with following values
	===============================
	Stack name                   : hello-sam
	Region                       : us-east-1
	Confirm changeset            : False
	Deployment s3 bucket         : aws-sam-cli-managed-default-samclisourcebucket-18pslmjrwi4hz
	Capabilities                 : ["CAPABILITY_IAM"]
	Parameter overrides          : {}
	Signing Profiles             : {}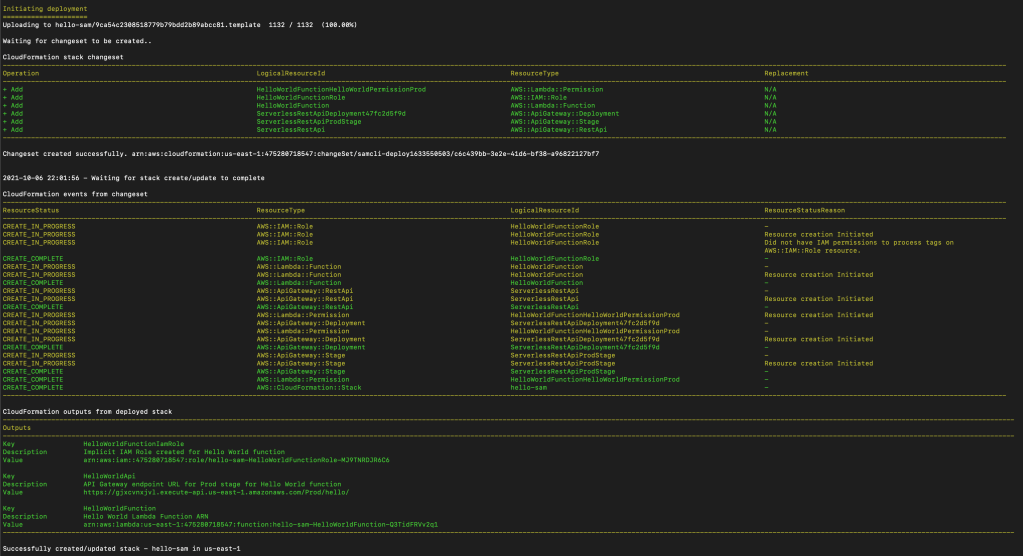
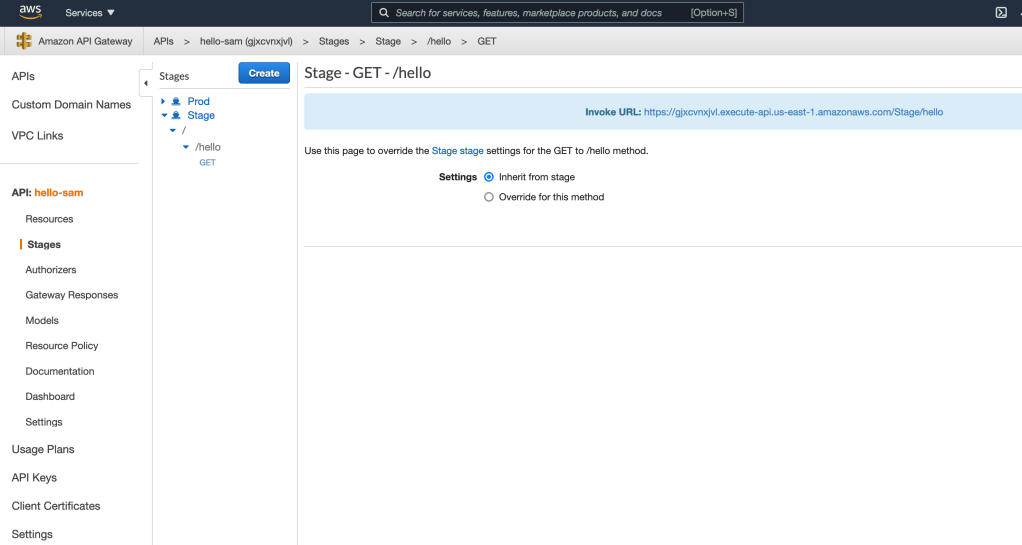
Now if you login to AWS console and navigate to Amazon API Gateway, you should see a hello-sam API listed there. Inside you can find that the API has a /hello GET endpoint. Navigate to Stages to see the different stages and the invoke url for each.
Step#4 (Optionally) You can also test your serverless function locally. Run this command sam local start-api to run the API locally. You should see an output like below.
faisalkhan@MacBook hello-sam % sam local start-api
Mounting HelloWorldFunction at http://127.0.0.1:3000/hello [GET]
You can now browse to the above endpoints to invoke your functions. You do not need to restart/reload SAM CLI while working on your functions, changes will be reflected instantly/automatically. You only need to restart SAM CLI if you update your AWS SAM template
2021-10-06 22:18:51  * Running on http://127.0.0.1:3000/ (Press CTRL+C to quit)
And when you browse the URL http://127.0.0.1:3000/hello, you can find more logs like below.
Invoking app.lambdaHandler (nodejs14.x)
Image was not found.
Removing rapid images for repo public.ecr.aws/sam/emulation-nodejs14.x
Building image...........................................................................................
Skip pulling image and use local one: public.ecr.aws/sam/emulation-nodejs14.x:rapid-1.33.0-x86_64.

Mounting /Users/faisalkhan/projects/personal/hello-sam/.aws-sam/build/HelloWorldFunction as /var/task:ro,delegated inside runtime container
START RequestId: 110f7195-3aa4-4ee3-90fb-957dbe76ae23 Version: $LATEST
END RequestId: 110f7195-3aa4-4ee3-90fb-957dbe76ae23
REPORT RequestId: 110f7195-3aa4-4ee3-90fb-957dbe76ae23	Init Duration: 0.23 ms	Duration: 117.94 ms	Billed Duration: 118 ms	Memory Size: 128 MB	Max Memory Used: 128 MB
No Content-Type given. Defaulting to 'application/json'.
2021-10-06 22:20:13 127.0.0.1 - - [06/Oct/2021 22:20:13] "GET /hello HTTP/1.1" 200 -
So our hello world application is tested locally as well as is deployed in AWS cloud. I hope this post will help someone to begin with AWS serverless. Please feel free to add comments or raise your questions.

1 Comment